

For Anthony liftgate troubleshooting, start with the manual or troubleshooting resource for your liftgate model and fault. The Standard Series and Deluxe Series repair manual is available as a PDF, which you can view with Adobe Acrobat Reader. In Anthony Liftgates’ troubleshooting resources, select the issue description that most closely matches the problem and follow its steps.
A liftgate that won’t respond can disrupt a workday, and the cause may be electrical, motor-related, or hydraulic. Learn how to find the right manual, check common fuse, wiring, and motor symptoms, and recognize when to stop troubleshooting yourself.
Begin by identifying your liftgate and checking the most accessible causes. These steps also help you decide what to do if the fault persists, so you can move toward a safe, practical repair instead of guessing.
Key Takeaways
- Match the troubleshooting steps to your liftgate model and symptom, then inspect hydraulic lines, hoses, fittings, and cylinders for leaks or damage.
- Before electrical work, disconnect truck power; check the specified fuses and look for loose, corroded, or damaged connections.
- A click when you activate the switch can point to a motor-start solenoid issue, while a motor that runs without lifting may indicate low battery voltage.
- Use the Anthony Liftgates troubleshooting resource that best matches the fault, and note what the gate does before following its recommended steps.
- If the fault persists or involves repairs beyond your checks, Tim Halpin Equipment offers liftgate and hydraulic repair.
Where can I find troubleshooting manuals for my liftgate brand?
Start with the manual for your liftgate’s brand and model. The Standard Series and Deluxe Series repair manual is available as a PDF. You’ll need Adobe Acrobat Reader to view it if it isn’t already installed.
To check hydraulic fluid, the pump area, and leaks on an Anthony liftgate, identify the model first. Then inspect the reservoir, lines, hoses, fittings, and cylinders. Common issues vary by model, so use the matching manual. For an AST, check the fluid level, hose condition, and visible leaks before following its troubleshooting steps.
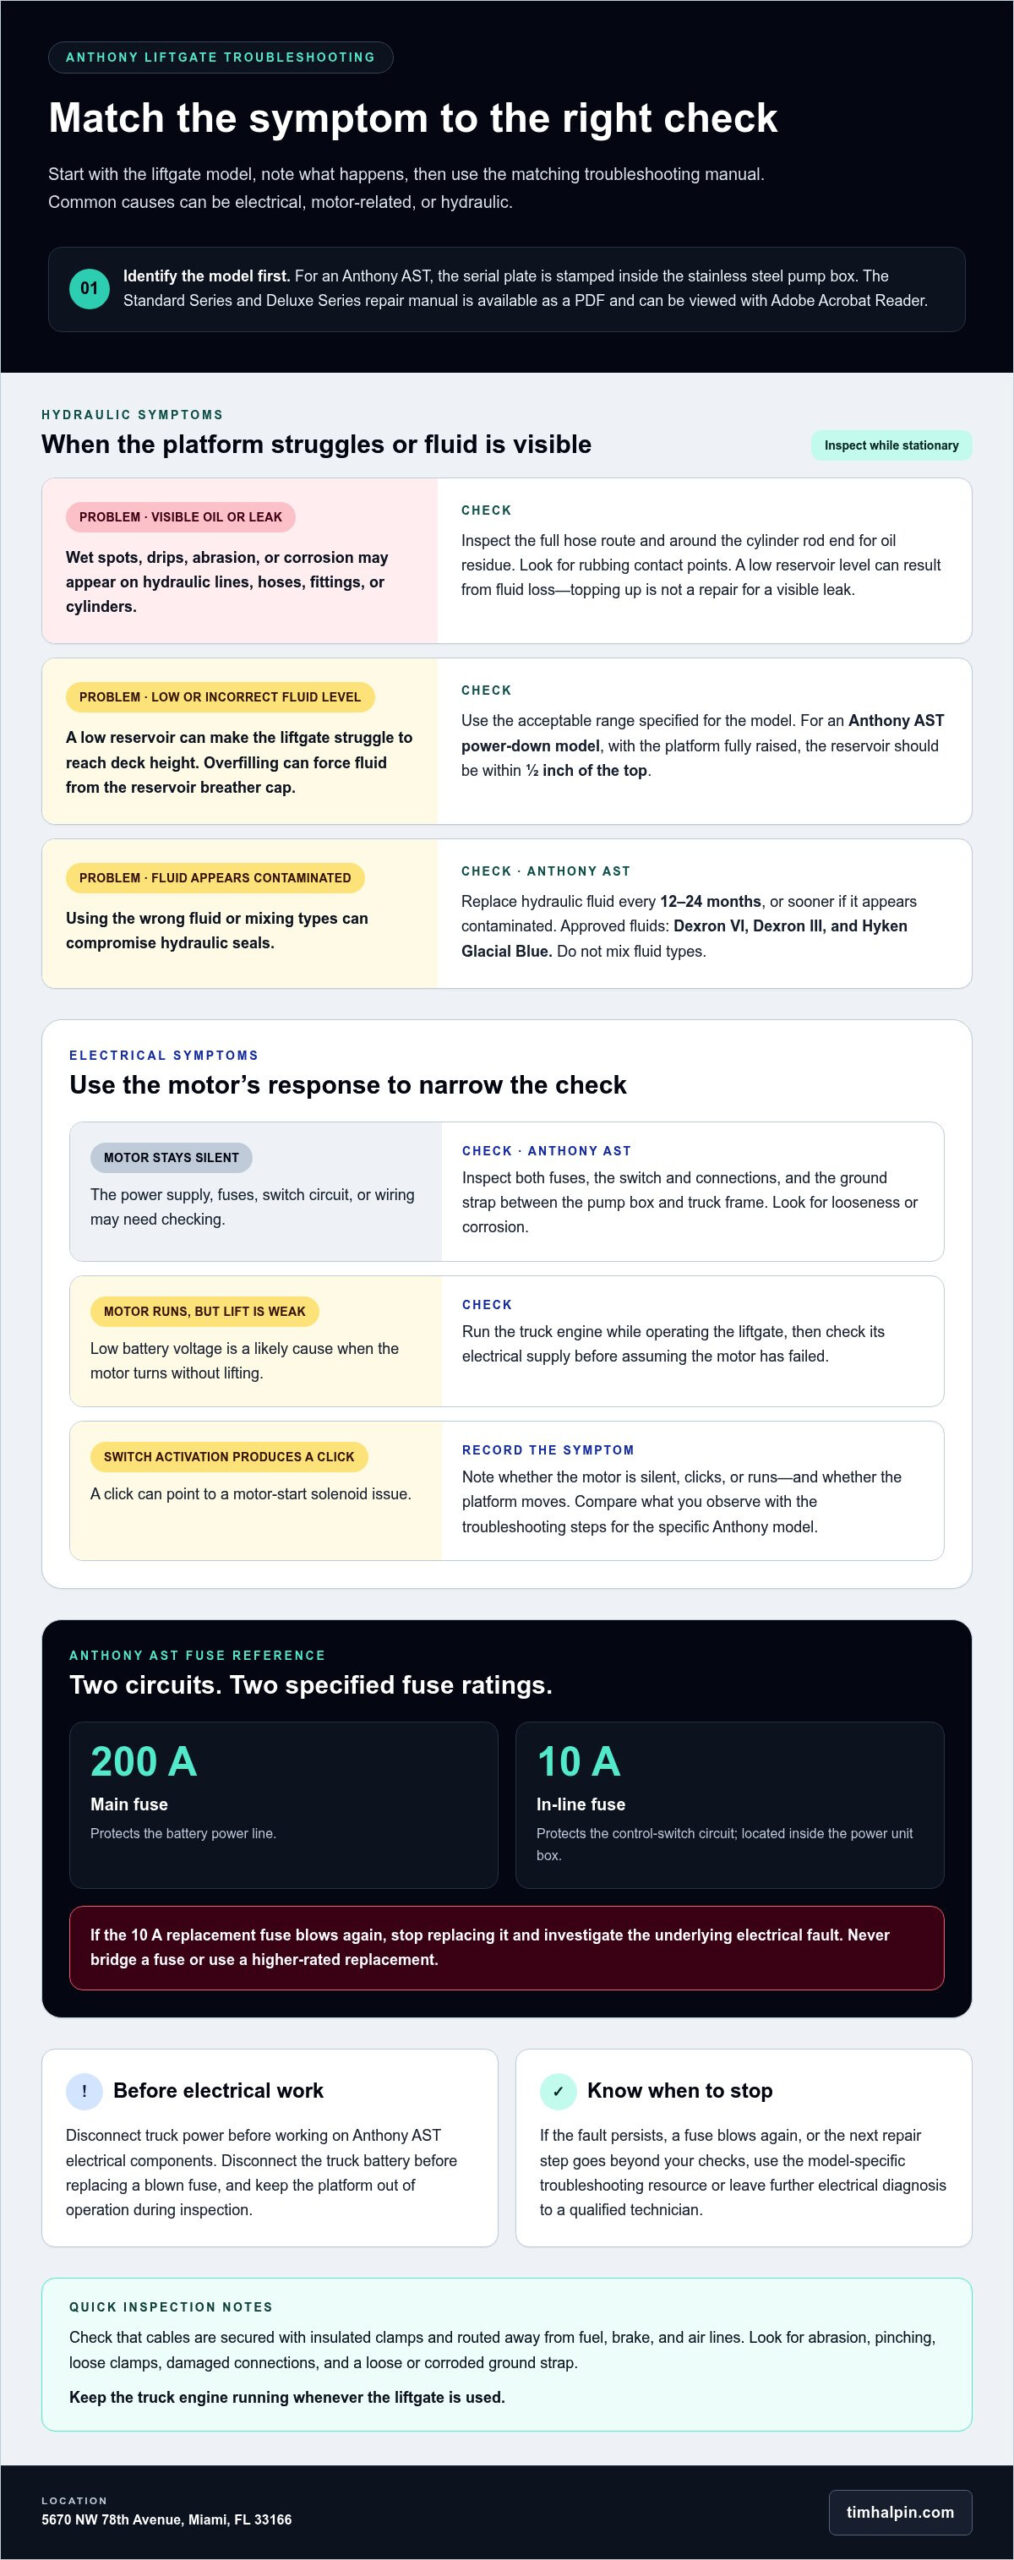
- Identify the liftgate. Find the model information before applying a repair step, since reservoir instructions can vary. On an Anthony AST, the serial plate is stamped inside the stainless steel pump box. Record the model details, then open the matching manual; the Standard Series and Deluxe Series repair manual is a PDF, viewed with Adobe Acrobat Reader.
- Look for hydraulic leaks. With the liftgate stationary, inspect hydraulic lines, hoses, fittings, and cylinders for wet spots, drips, abrasion, or corrosion. Check around the cylinder rod end as well, where escaping oil can leave residue. A low reservoir level can result from fluid loss, so don’t treat topping up as a repair for a visible leak.
- Check hose condition and routing. Anthony AST hoses and fittings should be inspected for leaks, abrasions, and corrosion. Trace each hose along its route and look for contact points that could cause rubbing during lift cycles. Hoses should be routed and secured to prevent that rubbing; damaged or leaking components need attention before continued operation.
- Read the reservoir level correctly. Use the acceptable fluid range specified for the particular model. A low level can make the liftgate struggle to reach deck height, while overfilling can force fluid from the reservoir breather cap. For Anthony AST power-down models, with the platform fully raised, the reservoir should be within ½ inch of the top.
- Use the correct fluid and replacement interval. Anthony AST hydraulic fluid should be replaced every 12-24 months, or sooner if it appears contaminated. Approved fluids are Dexron VI, Dexron III, and Hyken Glacial Blue. Don’t mix fluid types, because mixing can compromise hydraulic seals; match the replacement fluid to the approved types.
- Use the pump symptoms to guide your next check. If a liftgate struggles to reach deck height, compare its reservoir level with the model’s specified range and inspect for leaks. Keep the truck engine running whenever the liftgate is used. If the pump area shows oil or a cylinder rod end is wet, use the model-specific manual to guide the next repair step.
Fuses, breakers, switches, and wiring
If an Anthony liftgate motor runs but the platform won’t rise, low battery voltage is a likely cause. Run the truck engine while operating the liftgate, then check its electrical supply before assuming the motor has failed.
- Start with the symptoms. Activate the control switch and note whether the motor runs, clicks, or stays silent. A silent motor directs attention to the power supply, fuses, switch circuit, or wiring. A motor that turns without lifting may indicate low battery voltage. Record what happens with each control and compare it with the troubleshooting instructions for your Anthony model.
- Disconnect power before electrical work. Disconnect truck power before working on Anthony AST liftgate electrical components to avoid arc hazards. Disconnect the truck battery before replacing a blown fuse. Keep the platform out of operation during the inspection. Don’t bridge a fuse or use a higher-rated replacement to get the gate running; doing so bypasses the protection for that circuit.
- Inspect both Anthony AST fuses. The battery power line is protected by a 200 Amp main fuse, and the control-switch circuit has a 10 Amp in-line fuse inside the power unit box. If the motor won’t run, check both. Replace the control-switch fuse only with the same 10 Amp rating. If a replacement fuse blows again, stop replacing it and investigate the underlying electrical fault.
- Trace the switch circuit and connections. Look for a damaged switch, loose connection, or visibly worn cable between the control and power unit. Check that the ground strap between the pump box and truck frame is intact and free of corrosion. A poor ground can interrupt the electrical path, so note corrosion or a loose attachment instead of assuming an intermittent response means the switch is faulty.
- Check cable routing and battery symptoms. Anthony AST electrical cables should be secured with insulated clamps and routed away from fuel, brake, and air lines. Look along the cable run for abrasion, pinching, or loose clamps. If the motor turns but lifting is weak, low battery voltage is a likely cause. If the motor stays silent after you check the fuse and connections, leave further electrical diagnosis to a qualified technician.
Motor and motor-start solenoid problems
Use the sound and movement of an Anthony liftgate to narrow down the fault before replacing parts. A click, silence, or a turning motor each points to different checks.
- Record what happens when you press the switch. Note whether the motor is silent, clicks once, clicks repeatedly, or runs, and whether the platform moves. This description helps distinguish a motor-start solenoid symptom from a motor symptom. Compare the behavior with the troubleshooting steps for your specific Anthony model rather than assuming every unit uses the same procedures.
- Treat a click as a solenoid clue. A click when you activate a hydraulic liftgate switch can be a clue to a motor-start solenoid problem, but it does not confirm the cause. It suggests the control is triggering a response, but doesn’t prove the motor is working. Note when the sound occurs and whether it repeats each time you operate the switch. Use this symptom to guide the next diagnostic check.
- Separate the solenoid from the motor in the diagnosis. A small jumper cable can bypass a liftgate solenoid and send power directly to the motor to test whether it runs. This is a diagnostic test, not a permanent repair. Because it bypasses the normal control path, don’t improvise connections or use the jumper to operate the liftgate.
- Interpret the direct-power result carefully. If the motor runs during the jumper test, look next at the solenoid or its control path. If it doesn’t run, the motor or its power connection needs further diagnosis. One test won’t identify every possible fault, so record the result alongside the original switch symptom and follow the repair guidance for your Anthony model.
- Don’t replace parts based on sound alone. A click often points to the motor-start solenoid, but a failed motor can cause a similar no-lift symptom. Compare the switch response, motor response, and jumper-test result before choosing a repair. If the observations don’t line up, stop repeated testing and have the motor and solenoid circuit inspected.
- Keep the liftgate out of service if the fault remains. If the motor won’t run, the solenoid keeps clicking, or the test result is unclear, don’t keep pressing the switch as a fix. Record your symptoms, including when the click occurs and whether the motor turns. These details help focus the next Anthony liftgate diagnosis and avoid replacing parts without evidence.
Anthony liftgate troubleshooting resources
Use the Anthony troubleshooting resource that matches the fault, and follow its steps in order. Record the symptoms first, and don’t treat a warning signal as a diagnosis on its own.
Interpret Warning Lights, Beeps, and Error Codes
Record the exact signal and match it to the closest issue description. Note which light appears, whether it flashes, the beep pattern, and any displayed code. Include the liftgate model and what happened just before the signal, such as pressing a control or trying to raise the platform.
Anthony Liftgates’ troubleshooting guidance is organized by issue description. Choose the entry closest to the problem you observe and follow its steps. Don’t assume a beep or light means the same thing across models, or replace a part based only on a code. A signal is useful evidence, but the matching procedure provides context.
If the resource doesn’t match the symptoms, pause and compare your notes with the liftgate’s model information. For example, distinguish a signal that appears when you activate a switch from one that occurs while the platform moves. That timing can help you select the relevant issue description and avoid unrelated repair steps.
Assess Safe Operation and Repair
Check the liftgate’s safety features before using it. Anthony AST guidance says to verify that the safety latch pin moves freely before each use. Inspect the safety and operating decals monthly to ensure they remain visible and legible. Don’t operate the liftgate if a fault prevents the latch from moving freely or obscures the operating instructions.
Keep the truck engine running whenever you use the liftgate. If the latch pin is jammed, Anthony AST guidance recommends raising the platform slightly to relieve pressure before releasing the pin. Follow that procedure rather than forcing the latch. If the platform or latch won’t respond as directed, stop and use the issue-specific troubleshooting steps.
Limit repairs to checks you can perform safely and understand. Before electrical work, disconnect truck power to avoid arc hazards. Don’t bypass a control or force a platform through resistance to keep working. Record the warning signal, latch behavior, and platform response, then use those details to follow the matching Anthony troubleshooting procedure. Stop operating the liftgate if the fault remains or safe movement is uncertain.
What do Anthony liftgate warning lights, beeps, and error codes mean?
Match each warning to the troubleshooting instructions for your Anthony model. Record the signal and related symptoms before choosing a diagnostic step.
- Capture the exact warning. Write down the displayed code, light behavior, or beep pattern. Note whether a light stays on or flashes, and whether beeps occur once or repeat. Don’t guess what a signal means. Begin with the issue description that most closely matches what you observed in Anthony’s troubleshooting resources.
- Identify the liftgate before interpreting a code. Record the model information and compare it with the manual or troubleshooting entry you’re using. Don’t assume similar-looking signals mean the same thing across models. Keep the exact code or pattern with the model details, then follow the matching instructions rather than applying a procedure from another Anthony model.
- Connect the warning to what the gate was doing. Note whether the signal appeared when you pressed a control, while the platform moved, or after it stopped. Record whether the motor ran and whether the platform responded. These details help you select the closest issue description in Anthony Liftgates’ troubleshooting resources and keep diagnosis tied to the actual symptom.
- Follow the matching steps without skipping ahead. Select the issue description that most closely matches the problem, then follow its instructions in sequence. Don’t treat an error code alone as proof that a part has failed. If the steps direct you to inspect a particular system, use the manual for that model and stop before attempting a repair you can’t perform safely.
- Use safety behavior as a separate check. Before operating an Anthony AST liftgate, verify that its safety latch pin moves freely. If it’s jammed, AST guidance recommends raising the platform slightly to relieve pressure before releasing it. Don’t force the pin or ignore a warning signal. If the platform won’t respond as directed, stop operating it and use the appropriate repair procedure.
- Keep a clear record if the signal persists. Save the model, code or signal pattern, control used, and platform response together. This makes it easier to follow the right Anthony troubleshooting steps without repeating checks or confusing one symptom with another. If the fault remains after the listed steps, arrange liftgate repair support rather than continuing to operate a malfunctioning gate.
Interpret warning lights, beeps, and error codes using the troubleshooting instructions for the specific Anthony liftgate model. Don’t guess or assume a signal means the same thing across models. Record the exact signal and what the platform and motor were doing, then follow the matching steps. A code alone doesn’t prove a particular part has failed.
Tim Halpin Equipment: Truck Repair
Tim Halpin Equipment Corp provides liftgate and hydraulic repair when anthony liftgate troubleshooting hasn’t identified or resolved the fault. If the gate still won’t lift, a leak returns, or electrical symptoms persist after basic checks, stop operating it and arrange a repair assessment. A clear record of the model, warning signals, and symptoms helps explain what you’ve already checked.
For related equipment issues, Tim Halpin Equipment Corp also offers truck and trailer repair. The right service depends on where the fault occurs: the liftgate, hydraulic system, truck, or trailer. This is a practical next step when diagnosis needs to go beyond routine checks.
Contact Tim Halpin Equipment Corp to discuss the repair, or visit timhalpin.com.
Turn the next step into a clear repair plan
Use each fault to inform your next maintenance decision. A brief record of when the problem occurs, how the liftgate responds, and whether the fault returns can help distinguish an isolated issue from a recurring one. This gives diagnosis a clearer starting point and helps focus the repair process.
Effective Anthony liftgate troubleshooting also means knowing when to stop. If the problem persists, the equipment behaves unpredictably, or the repair goes beyond safe checks, stop operating the gate and seek professional diagnosis. Repeating tests without a clear next step can make the problem harder to assess.
Tim Halpin Equipment offers truck, liftgate, and trailer repair for faults involving the liftgate or connected equipment. Share the symptoms and checks you’ve completed to help determine the next step.
For help with a repair, contact Tim Halpin Equipment. A clear plan can help you move forward with confidence.
Frequently Asked Questions
What if I can’t fix the problem myself?
Stop troubleshooting and arrange professional diagnosis if the liftgate still malfunctions or moves unpredictably. Note the model, symptoms, and checks you’ve completed to give the repair technician a useful starting point. Tim Halpin Equipment offers liftgate and hydraulic repair. Operators in Miami, Doral, Fort Lauderdale, Key West, Medley, Hialeah, Kendall, and across South Florida can contact the business about a persistent fault.
Why is My HYDRAULIC Liftgate Not Working?
A hydraulic liftgate may not move if fluid is low, a leak reduces pressure, or the power unit doesn’t operate. Compare the reservoir level with the range specified for your model, then note whether the motor runs and whether the platform moves. These separate observations help distinguish a hydraulic symptom from an electrical or motor-start problem. Don’t continue operating the liftgate if fluid is visibly leaking.
Why is my liftgate leaking fluid?
Fluid on or beneath the liftgate often points to a leak in a hydraulic line, hose, fitting, or cylinder. Check where the fluid first appears, such as around a connection or cylinder rod end, and look nearby for abrasion or corrosion. Fluid loss may also cause the reservoir level to fall. Don’t simply refill the reservoir and continue operating with an active leak; its location guides the repair.
How do I troubleshoot an Anthony liftgate that won’t operate?
Start by recording the exact response to each control: no sound, a click, motor operation, or platform movement. Then compare that symptom with the troubleshooting instructions for the liftgate’s model. For an AST, the 200 Amp main fuse protects the battery power line, while a 10 Amp in-line fuse protects the control-switch circuit. Disconnect truck power before electrical work, and don’t bypass a fuse.
How do I diagnose an Anthony liftgate that won’t raise or lower?
To distinguish a liftgate that won’t raise from one that won’t lower, note which direction fails and whether the motor runs. If the motor runs but the platform won’t rise, low battery voltage is a likely cause. Check the hydraulic fluid level against the model’s requirements and inspect for leaks. If the platform struggles to reach deck height, a low reservoir level is one possible cause.
How do I test Anthony liftgate fuses, wiring, switches, and solenoids?
Disconnect truck power before inspecting electrical components, and disconnect the truck battery before replacing a blown fuse. On an Anthony AST, check the 200 Amp main fuse and the 10 Amp control-switch fuse; replace the latter only with the same rating. Look for damaged wiring and a corroded ground strap. A switch-activated click often indicates a motor-start solenoid problem, but don’t improvise a bypass test.
Where can I find the manual and wiring diagram for my Anthony liftgate model?
Identify the liftgate model first, then use the matching Anthony troubleshooting resource and manual rather than relying on instructions for another unit. The Standard Series and Deluxe Series repair manual is available as a PDF and requires Adobe Acrobat Reader to view. For a wiring diagram, use documentation that matches the exact model and electrical setup; an unrelated diagram can lead to incorrect checks or connections.
What are the most common Anthony liftgate problems by model and their fixes?
For Anthony AST models, check the specified fuses and connections if the motor is silent. A click usually points to the motor-start solenoid, while a motor that runs without lifting may indicate low battery voltage. For hydraulic issues, inspect the fluid level, hoses, lines, fittings, and cylinders for leaks or damage, then follow the model-specific troubleshooting steps. Use the matching manual for other models.
