

A service body can look like a close fit on paper and still miss the truck where it matters. To measure for a service body, use a tape or 3D scan to capture the truck’s frame width, cab-to-axle distance, usable frame length, cab clearance, and height, then record each measurement clearly.
It’s easy to focus on the dimensions of the service body you want, but the truck’s chassis and cab determine what will fit. Measure the truck itself, keep the tape level and snug around surfaces, and repeat each reading to catch placement errors.
Key Takeaways
- Choose a measuring method that suits the truck and the detail you need, then record each reading with its reference point.
- Prepare the truck and keep measurement conditions consistent so repeated readings are easier to compare.
- Measure height from a clear, repeatable reference point and account for anything that could affect the truck’s overall clearance.
- Watch for common errors such as a sagging tape, unclear endpoints, or measurements taken at an angle.
- When truck condition or repair needs affect your measurements or upfitting plans, truck repair can help address the mechanical side.
Choosing between a fabric tape, smart tape, and 3D scan
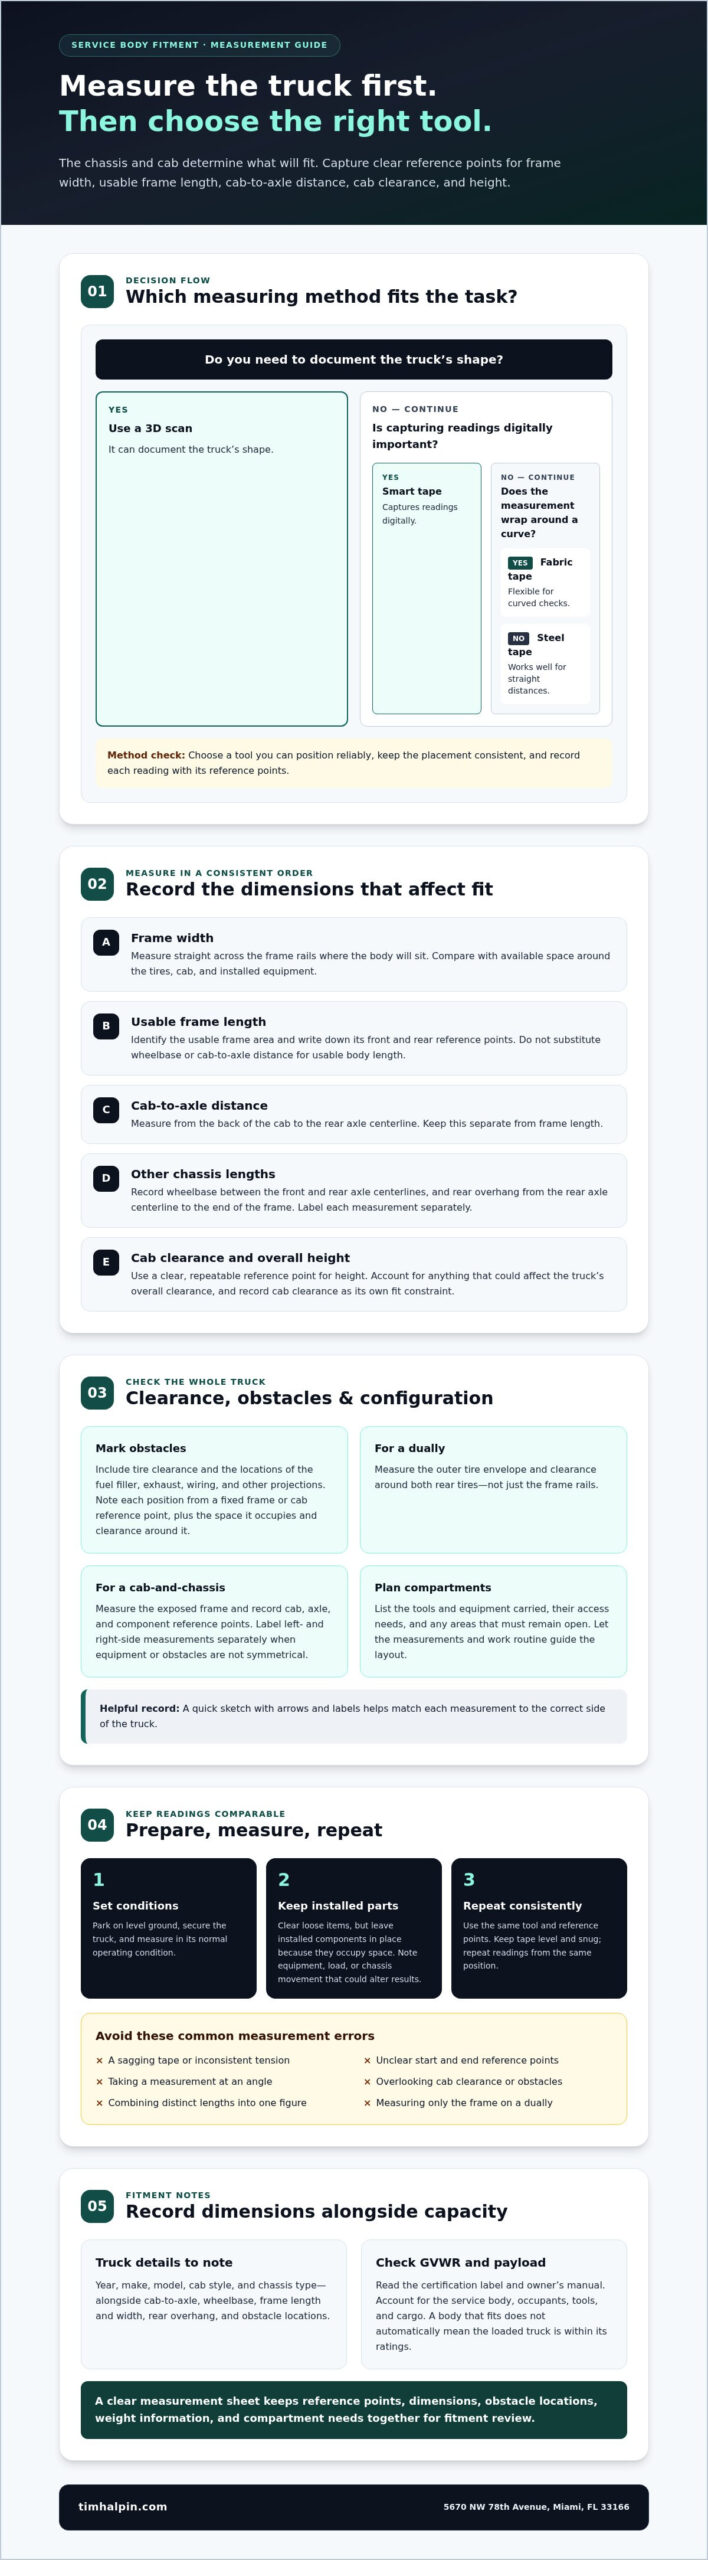
- For a practical answer to how to measure for a service body, start with the truck’s frame, cab, axle, and obstacles. A steel measuring tape works well for straight distances, while a fabric tape can wrap around curves. A smart tape can capture readings digitally, and a 3D scan can document the truck’s shape. Choose the method you can position reliably and record clearly.
- Before measuring, list the truck dimensions that affect body fit: frame width, usable frame length, cab-to-axle distance, cab clearance, and overall height. Include tire clearance and the locations of the fuel filler and exhaust. These measurements describe different fit constraints, so label each one rather than combining them into a single length or width.
- To measure frame width, measure straight across the frame rails where the body will sit. To measure length, identify the usable frame area and record its front and rear reference points. Record cab-to-axle distance separately, from the back of the cab to the rear axle centerline, so it isn’t mistaken for frame length.
- Mark obstacles before recording nearby dimensions. For a fuel filler, exhaust outlet, wiring, or other projection, note its position relative to a fixed frame or cab reference point. Measure the space it occupies and the clearance around it. A quick sketch with arrows and labels helps match each measurement to the correct side of the truck.
- For a dually, measure the outer tire envelope and clearance around both rear tires, not just the frame rails. On a cab-and-chassis truck, measure the exposed frame and record its cab, axle, and component reference points. Chassis layouts differ, so label left- and right-side measurements separately wherever equipment or obstacles are not symmetrical.
- Keep tape placement and tension consistent. For circumference measurements, keep the tape parallel to the ground, snug without compressing the surface, and repeat readings from the same reference point. A soft, flexible body-measurement tape commonly has a 150cm/60 inches capacity; use it for curved checks, not long frame spans. A Marine Corps study found circumference methods correctly classified 91.5% of male Marines and 92% of female Marines compared with DEXA. That finding concerns body assessment, not truck fit, but reinforces why consistent placement matters.
What are Body Measurements and How Do You Figure Them Out?
For truck fitment, measurements describe the chassis and available mounting space, not a person’s body. Set consistent conditions first, then record the reference points, dimensions, and vehicle details together.
Set Consistent Measurement Conditions
Park on level ground, secure the truck, and measure it in its normal operating condition. Use the same reference points and tool for repeated readings, since changing the tape angle or endpoint can affect accuracy. Note any equipment, load, or chassis movement that could alter the result. Clear loose items, but leave installed components in place because they occupy space.
Measure Cab-to-Axle, Wheelbase, and Overhang
Measure cab-to-axle distance from the rear of the cab to the rear axle centerline. Measure wheelbase between the front and rear axle centerlines, then measure rear overhang from the rear axle centerline to the end of the frame. Keep each length separate in your notes. This prevents wheelbase from being mistaken for usable body length and shows how the truck’s layout affects placement.
Determine Body Width and Compartment Configuration
Measure across the frame rails where the body mounts, then compare that width with the available space around the tires, cab, and installed equipment. Choose a body width that fits the chassis without blocking clearance. For complex upfits and specialized builds, vehicle conversion specialists such as Auto Industries Factory rely on these detailed dimensions to ensure custom bodies fit securely. For compartment planning, list the tools and equipment you carry, their access needs, and any areas that must remain open so your measurements and daily routine guide the layout.
Check Payload and GVWR
Read the truck’s certification label and owner’s manual for its GVWR and payload information. Account for the service body, occupants, tools, and cargo when assessing the truck’s remaining capacity. Don’t assume that a body that fits means the loaded truck is within its ratings. Record the weight information alongside the dimensions so it can inform the fitment review.
For a fitment quote, provide the year, make, model, cab style, and chassis type, plus cab-to-axle, wheelbase, frame length and width, rear overhang, and obstacle locations. Include GVWR and payload details, along with your compartment needs. A clear measurement sheet gives an installer a practical starting point for service body installation planning.
If a fitment discussion also involves personal body measurements, keep those notes separate from chassis dimensions. For this at-home body measurement protocol, take each measurement twice and record the average; repeat body-circumference measurements twice to improve accuracy. For consistent body measurement photos, use the same lighting, similar fitted clothing, the same standing position, and the same camera distance. Consistent conditions make records easier to compare and keep them distinct from frame, axle, and clearance readings.
The guide defines shoulder length as the distance from the highest point of the shoulder at the neckline to the outer shoulder bone. Across-shoulder measurement runs from one shoulder socket to the other, so record it separately rather than using it in place of shoulder length. To locate the natural waist, have the person bend to the side and mark where the body bends. Label each personal measurement clearly and keep it apart from truck body-width and mounting-space figures when sharing fitment details.
Tools and preparation for taking measurements
Gather a steel measuring tape, a notebook, and a way to mark reference points before starting. Use a rigid tape for straight frame dimensions and a flexible tape around curved surfaces, such as the tire’s outermost point.
- Choose tools for the surfaces you’ll measure. A metal measuring tape can show millimetres or inches, so choose one unit and use it throughout. A soft tape with 150cm/60 inches capacity can follow curves, but it can sag across a long frame span. A smart tape can store readings digitally, while a 3D scan can capture surrounding shapes. Neither replaces clear reference points.
- Prepare a measurement sheet before approaching the truck. Create separate spaces for frame width, usable length, cab-to-axle distance, wheelbase, rear overhang, height, and obstacle locations. Add columns for units and notes. For example, label a reading “left frame rail” rather than recording an unexplained number.
- Park the truck on a firm, level surface and clear the measuring path. Move loose tools, hoses, and debris that could interfere with the tape. Leave installed parts in place, since fuel fillers, exhaust components, and brackets affect available space. If a measurement crosses a dirty or obstructed area, clean the contact points first.
- Set up simple reference aids before taking the first reading. Use chalk or removable tape to mark the start and endpoint, and keep a flashlight nearby for shaded areas of the frame. A straightedge can help project a frame edge to the tape’s endpoint. Photograph each marked location to keep the written measurement connected to the correct truck feature.
- Keep the tape straight and taut for linear dimensions, without bending it around corners. Read the scale directly above the endpoint to avoid viewing it at an angle. For a curved contour, place the flexible tape around the surface without pulling it tight. Record whether the reading follows a surface or spans between two points.
- Record measurements as you take them, not from memory afterward. Write the number, unit, location, and direction, such as “frame width, outside-to-outside.” Repeat any unclear reading from the same marked points. If a smart tape or 3D scan is used, save its file with the truck’s identifying details and note which dimensions still need manual confirmation.
For monitoring personal body measurements, taking measurements every two weeks is usually sufficient. Keep those entries separate from vehicle dimensions, identify what each measurement refers to, and use consistent units and reference points so later readings can be compared. Record each result when you take it rather than relying on memory, and note the method used.
The Marine Corps uses DEXA or BIA confirmation measurements for Marines over body-fat standards before taking negative administrative action. Keep this context distinct from truck measurements, and organize records so each entry remains tied to its subject and method. When documenting either kind of measurement, label the entry clearly and retain the related notes.
Common measurement mistakes
- Use the same reference points for every reading. A common mistake is measuring from the cab edge once, then from a step or trim piece later. Mark the chosen start and endpoint, then label them in your notes. If a measurement changes when repeated, review the reference marks before deciding which value to keep.
- Keep the tape aligned with the dimension being measured. A tape angled across the frame can make a width appear longer, while a sagging tape can distort a long span. For example, make sure a frame-width reading runs directly across the rails, not diagonally from one rail’s corner to the other.
- Don’t measure across a movable object when the body must fit around fixed truck features. A loose hose can shift, but an exhaust outlet or fuel filler affects available clearance. Note each obstruction’s location and projection separately. If the tape follows an obstacle, record that as a contour measurement, not as straight-line clearance.
- Label paired sides separately rather than assuming the truck is symmetrical. A dually’s tire position, a bracket, or an exhaust component may differ from left to right. Record each side under its own label. A simple sketch showing the driver side, passenger side, and rear axle helps keep each measurement associated with the right location.
- Keep similar-sounding dimensions separate. Wheelbase, cab-to-axle distance, usable frame length, and rear overhang describe different points. Combining them can mislead a fitment assessment. Write the exact dimension name beside every value, and include its endpoints, such as “rear axle centerline to frame end.”
- Don’t rely on a single reading or a correction based on memory. Repeat a questionable measurement from its original reference points, then compare the results. If they differ, check the tape alignment, endpoint placement, and nearby equipment. Note “measurement repeated after repositioning” rather than silently changing the recorded value.
- Check whether the body width accounts for tire and cab clearance, not just frame width. The body may align with the rails yet interfere near a tire shoulder, step, or cab corner. Compare the measured space with the truck’s visible outline and mark tight areas on your sketch. A photograph with a marked reference point can clarify an unusual contour.
Height measurement
Keep the truck’s overall height separate from the service body’s height above its mounting surface. Record each vertical dimension with its starting and ending points, so the figures clearly describe what you measured.
- Park the truck on a level surface and choose a straight vertical reference. Measure from the ground to the top of the frame where the body will mount. Keep the tape upright, not angled toward the cab or rear wheel. Record the surface and endpoint, since uneven ground or a tilted tape can change the reading.
- Measure cab height from the same ground level to its highest relevant point. Note roof equipment, antennas, or other additions separately if they affect the truck’s actual profile. This reading helps compare the cab with the body’s intended top line. Don’t assume the cab roof and frame have a standard relationship.
- Measure the body’s vertical space from the mounting surface to the planned top edge. This differs from ground-to-body height. Record both dimensions if the fitment discussion needs them. For example, frame-to-body measurement describes the body itself, while ground-to-body measurement includes the truck’s frame position.
- Check cab clearance where the body will sit behind the cab. Measure the vertical relationship between the mounting area and nearby cab features, then note any roof trim or rear cab projection that reduces the available space. Keep the tape straight and slightly clear of curved trim, so the reading represents the intended clearance rather than a surface contour.
- Record tire and suspension details that may affect loaded height. Use the truck’s current configuration and note whether its stance differs from its normal operating position. Don’t estimate changes from memory. If a custom setup alters the frame height, capture the actual mounting-surface position and describe the setup in your notes.
- Repeat each vertical reading from the same start and endpoint, then compare the results. If they differ, check whether the tape shifted, the ground slopes, or the endpoint was unclear. Write the measurement, unit, location, and direction together. A useful note might say “ground to frame top, driver side,” rather than listing an unlabeled height.
For help planning a fit based on your truck’s height measurements, discuss your service body fitment.
Tim Halpin Equipment Corp: Truck Repair
Tim Halpin Equipment Corp provides truck repair when mechanical issues need attention alongside service body planning. If the truck’s condition makes dependable measurements difficult, address that concern before relying on the figures for fitment decisions. The company also handles liftgate repair, trailer repair, and hydraulic repair for related equipment needs. Find Tim Halpin Equipment Corp at 5670 NW 78th Avenue, Miami, FL 33166. Keep your measurement notes available so the truck’s dimensions and condition can inform the next steps. Contact Tim Halpin Equipment Corp or visit timhalpin.com to discuss your truck repair needs.
Turn Your Measurements Into a Confident Next Step
A measurement sheet is most useful when it supports a decision, not just a collection of dimensions. After learning how to measure for a service body, bring your notes to the planning conversation and explain how the truck is used, what equipment it carries, and which areas need easy access. That context connects fitment details with the work the vehicle must handle.
Before moving forward, review any reading with an unclear endpoint or awkward angle. Mark it for remeasurement so the next discussion starts with a dependable record. If mechanical concerns affect the truck’s readiness, Tim Halpin Equipment Corp also offers truck repair, liftgate repair, and trailer repair.
For a practical next step, connect with Tim Halpin Equipment Corp and bring your measurements and work requirements into the conversation. Careful preparation gives you a stronger foundation for choosing a setup that suits your truck and your day-to-day work.
Frequently Asked Questions
How do I know which size chart column to use to get the measurements I need?
Choose the column that matches the truck’s exact make, model, year, cab style, and chassis configuration. Don’t select one based only on a similar-looking vehicle or preferred body width. For a work truck in Miami, Doral, Fort Lauderdale, Key West, Medley, Hialeah, Kendall, or elsewhere in South Florida, compare the chart’s labels with the vehicle identification and your recorded chassis details. If the chart doesn’t clearly match, pause before using its dimensions to guide a fitment decision.
What are common service body measurement mistakes and fitment risks?
A close measurement doesn’t prove that the complete setup will fit. A body can appear compatible while its compartment doors, mounting points, or intended access areas conflict with the truck’s actual configuration. For example, nearby equipment may block access to a planned compartment. Review the complete layout against the truck’s intended work, and resolve unclear fitment details before proceeding.
